
Ecommerce photography can help your products looks their best and lead to an increase in sales and conversions. This article will teach you what it is, how to take your own photos and which questions to ask if you want to hire a professional.
Inside this article
- How much does ecommerce photography cost?
- Items needed to do your ecommerce photography in-house
- Overview of how to shoot ecommerce photography
- Full ecommerce photography workflow
- Questions to ask ecommerce photographers
What Is Ecommerce Photography?
Ecommerce photography is the act of taking pictures of products to post online. The process can include editing, cataloging, and indexing the photos. Product photograph and ecom photography are synonyms.
Ecommerce photos give shoppers a visual representation of an item—something a text-only description can’t provide. The shopper can look at the picture to decide if the product will meet their needs.
Why Is Ecommerce Photography So Important?
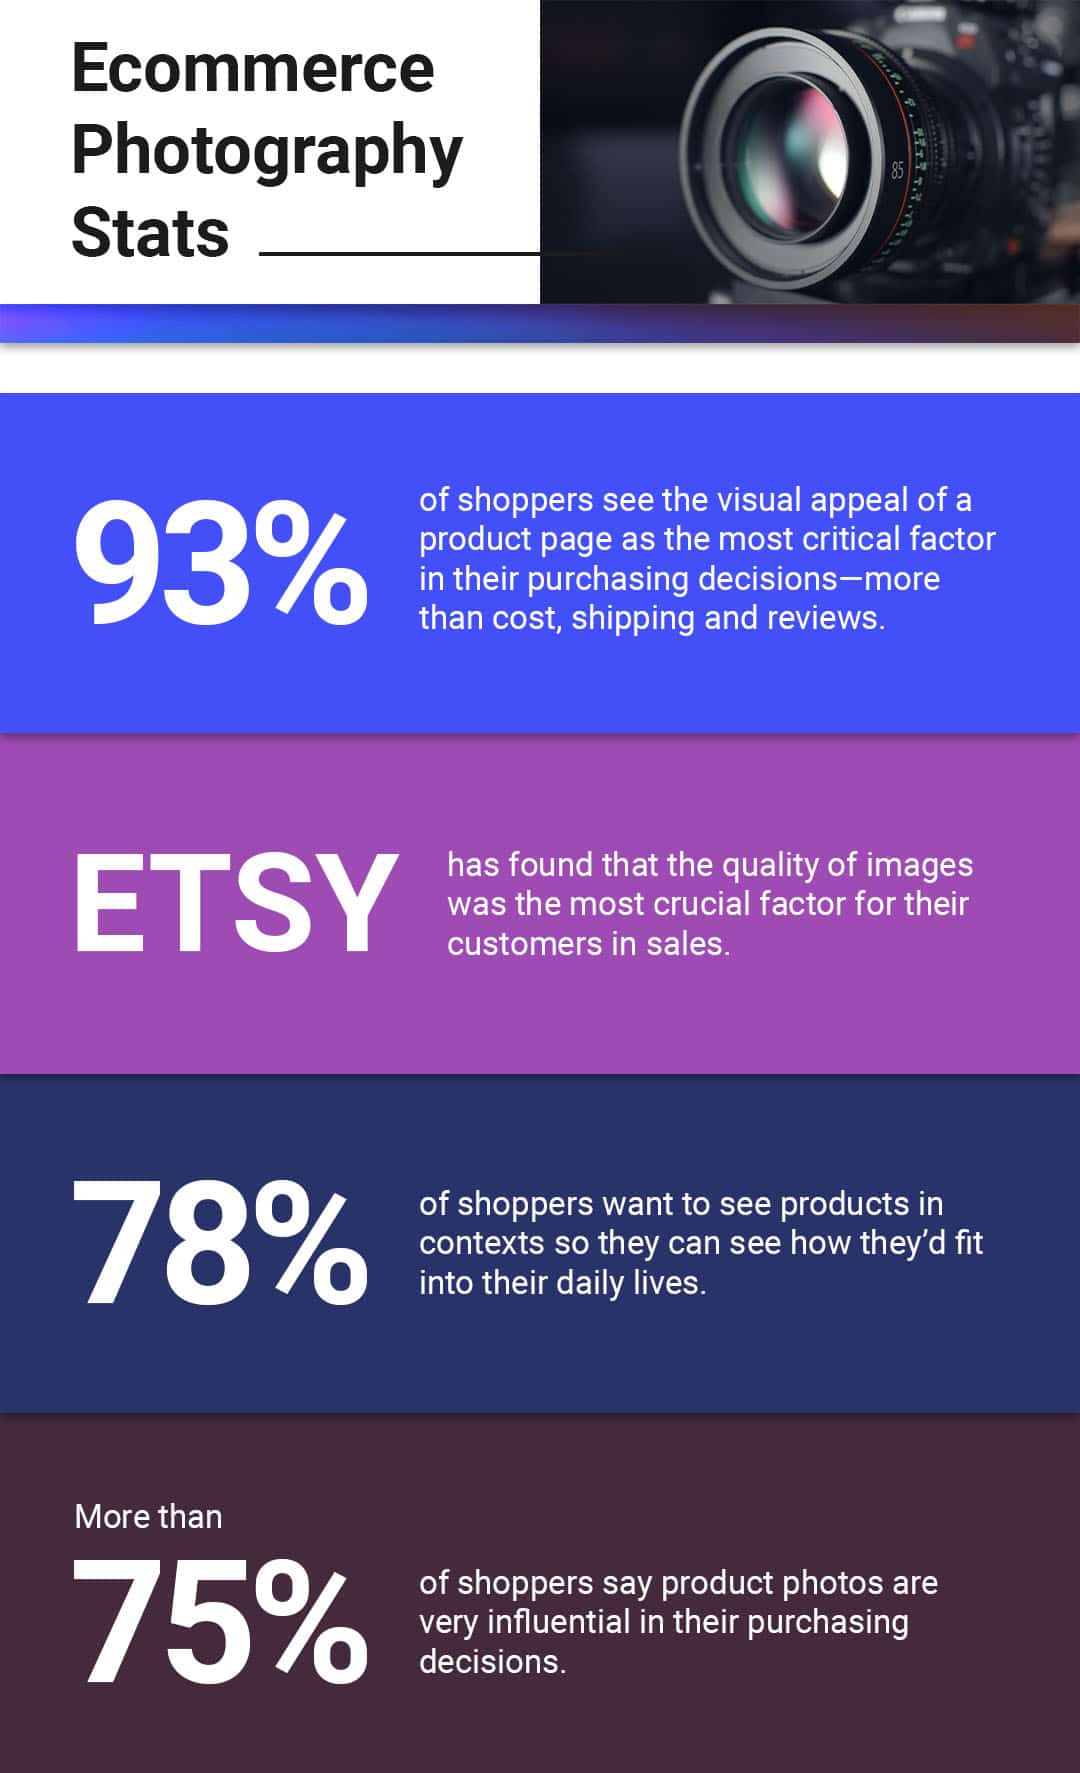
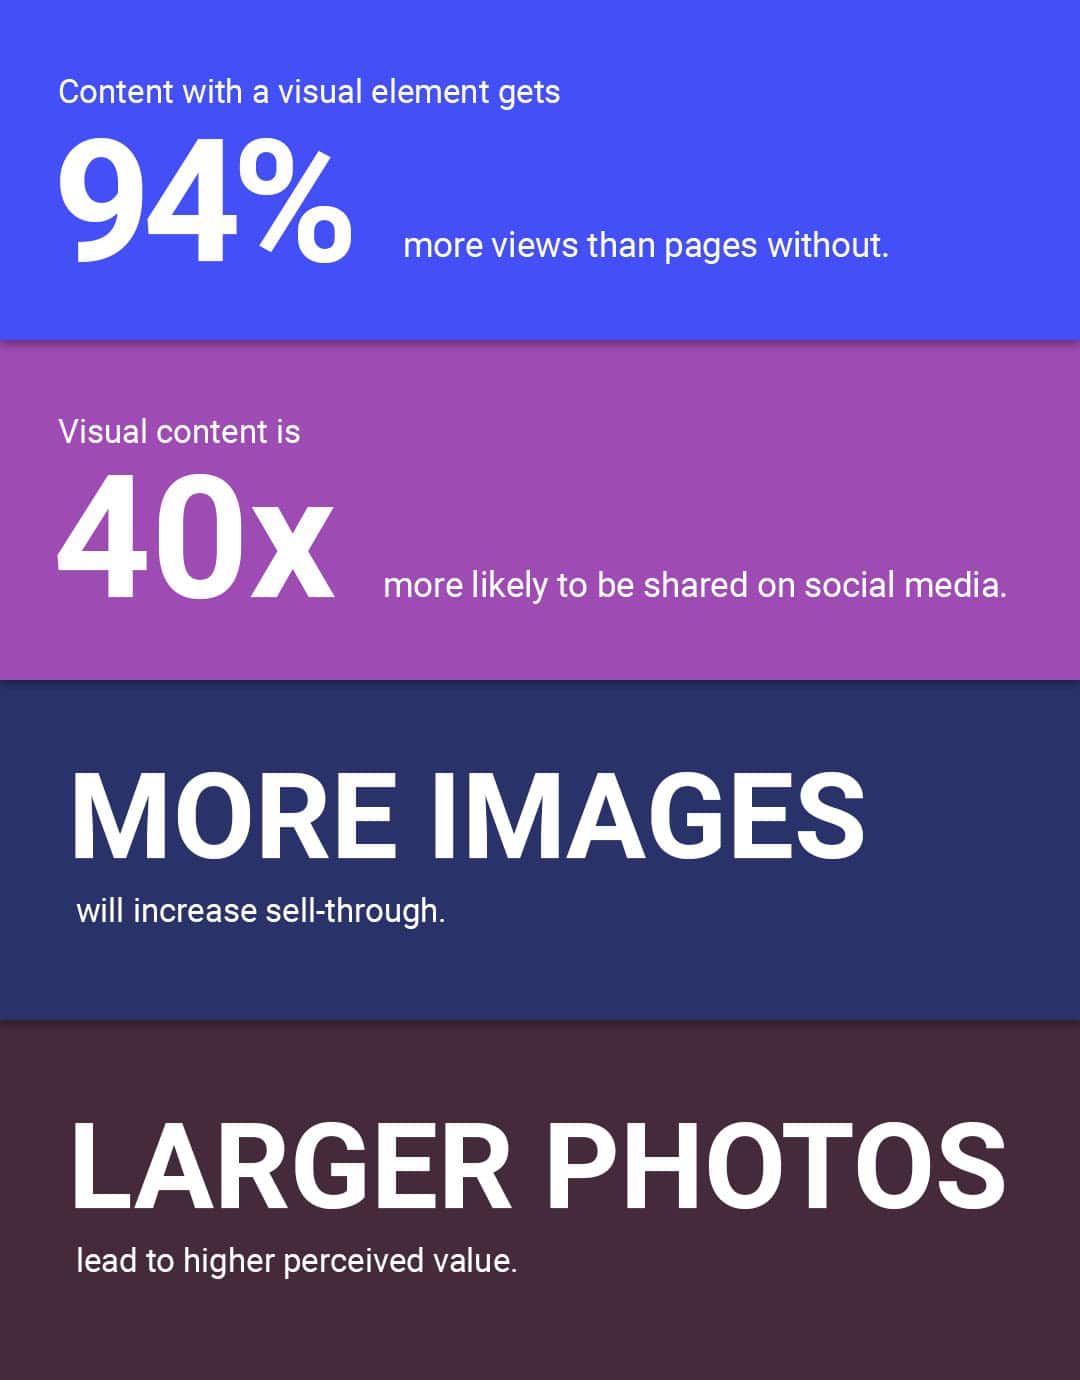
Studies and surveys show that ecommerce photography can increase sales. Web pages with images get more views. Photos (good or bad) influence purchase decisions.
The following references highlight the importance of ecommerce photography:

How Much Does Ecommerce Photography Cost?
Ecommerce photography costs can vary. You can take your own pictures inexpensively (if you have the equipment). If stock photos are available, these are faster and less expensive to use than hiring a photographer to take custom pictures.
If you hire a professional, the photographer’s level of experience and your location will impact the price. For example, a photographer may ask you to pay by the hour, the day, the number of images, or the number of products. Photographers can charge by product, hours, or day. Ecommerce photography costs can range from $25 to thousands of dollars, depending on how many products you must photograph. It is important is to get at least three estimates if you are not doing the photos yourself.
Items Needed to Do Your Ecommerce Photography In-House
To take your own ecommerce photos, you will need a camera. You will also want to use a tripod, a light source and reflectors, a backdrop, something to keep the items being photographed from moving, a studio space, and photo editing software.
- Camera: A smartphone, a point-and-click camera or an SLR will work. Higher-quality images lead to better sales as shown in a study about understanding image quality in the market place. Use the best-quality camera available.
- Tripod: Use a tripod to keep your camera steady to prevent blur and maintain the shot and angle you have set up between exposures.
- Studio Space: You can shoot in any area that is big enough to hold your equipment. A table or desk may suffice if you are photographing products like jewelry or pens. However, if you are shooting bicycles or people modeling clothes, you will need all or part of a room.
- Securing Tools: Tape or glue dots will allow you to secure small items so they do not move between shots. Depending on what you are shooting, clamps, safety pins, clothespins, fishing line, cable ties, and other tools might be part of your kit.
- Cleaning Tools: Depending on your item, you might need cans of compressed air, alcohol wipes, a lint roller, or soap and water. Figure out what works best to remove dust, debris and fingerprints, and then ensure that you have a good supply.
- Lighting: You can use direct or diffuse lighting depending on what works best for the product that you are shooting.
- Reflectors: These can help eliminate shadows by bouncing light to all parts of the subject, and they can also create diffuse lighting. These may also be called bounce cards.
- Photo Editing Software: These applications allow you to tweak your pictures to make the products look their best. There are free or low-cost programs, or you can use high-end applications like Adobe Lightroom or Adobe Photoshop.
- Backdrop: These are generally white, allowing an item to stand out in pictures. A white sweep is a commonly used backdrop style.
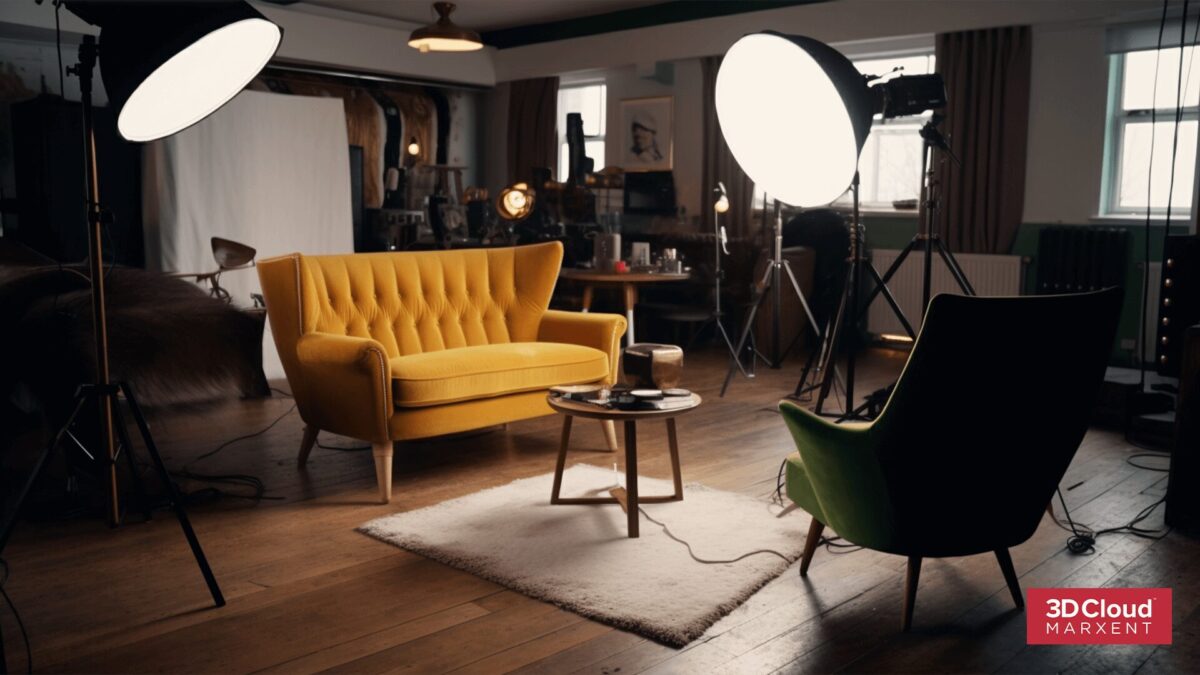
Props that create context can help your photos stand out. For example, if you sell couches, having a lamp, a rug, and a side table in the picture will help shoppers imagine how the piece might fit into their own living space. Likewise, if you sell cheese knives, a cutting board and a cheese wedge will give shoppers a more persuasive image of the product.
Overview of How to Shoot Ecommerce Photography
The basic steps of ecommerce photography are simple: situate the item you are photographing, take some photos, choose the ones you like best, edit them, and post them. However, the details of executing this photography can be complicated.
Aspects to keep in mind when shooting ecommerce photography include the following:
- The session plan should include time for several shots and angles so you can find the combination that gives the best results and provides multiple images to work with. Numerous images generally lead to higher sales than single images.
- The studio space needs good lighting to make the products look their best.
- The camera should be on a tripod to keep it still and to allow you to take more pictures after adjusting lights or camera settings.
- The product may need to be secured to the table or platform to prevent it from moving or falling over.
- Pictures will need editing to remove blemishes and background shadows, to tweak the lighting and to incorporate other modifications that will improve the product’s appearance.
Full Ecommerce Photography Workflow
Creating ecommerce photos is more than just taking a few pictures and posting them. Planning, preparation, and post-production activities will help you achieve superior photos.
Note: This section assumes you are taking photos in-house. If you’ve hired a professional photographer, you’ll need to work with them on establishing the cataloging structure (how you will store and organize files), quality standards, aesthetics, and file-naming conventions of the images.
General Planning and Preparation for Ecommerce Photo Workflow
Before taking a single picture, create a plan for naming your images, where and how to organize and store the archive, and more.
The following methods will improve the organization of your photographs:
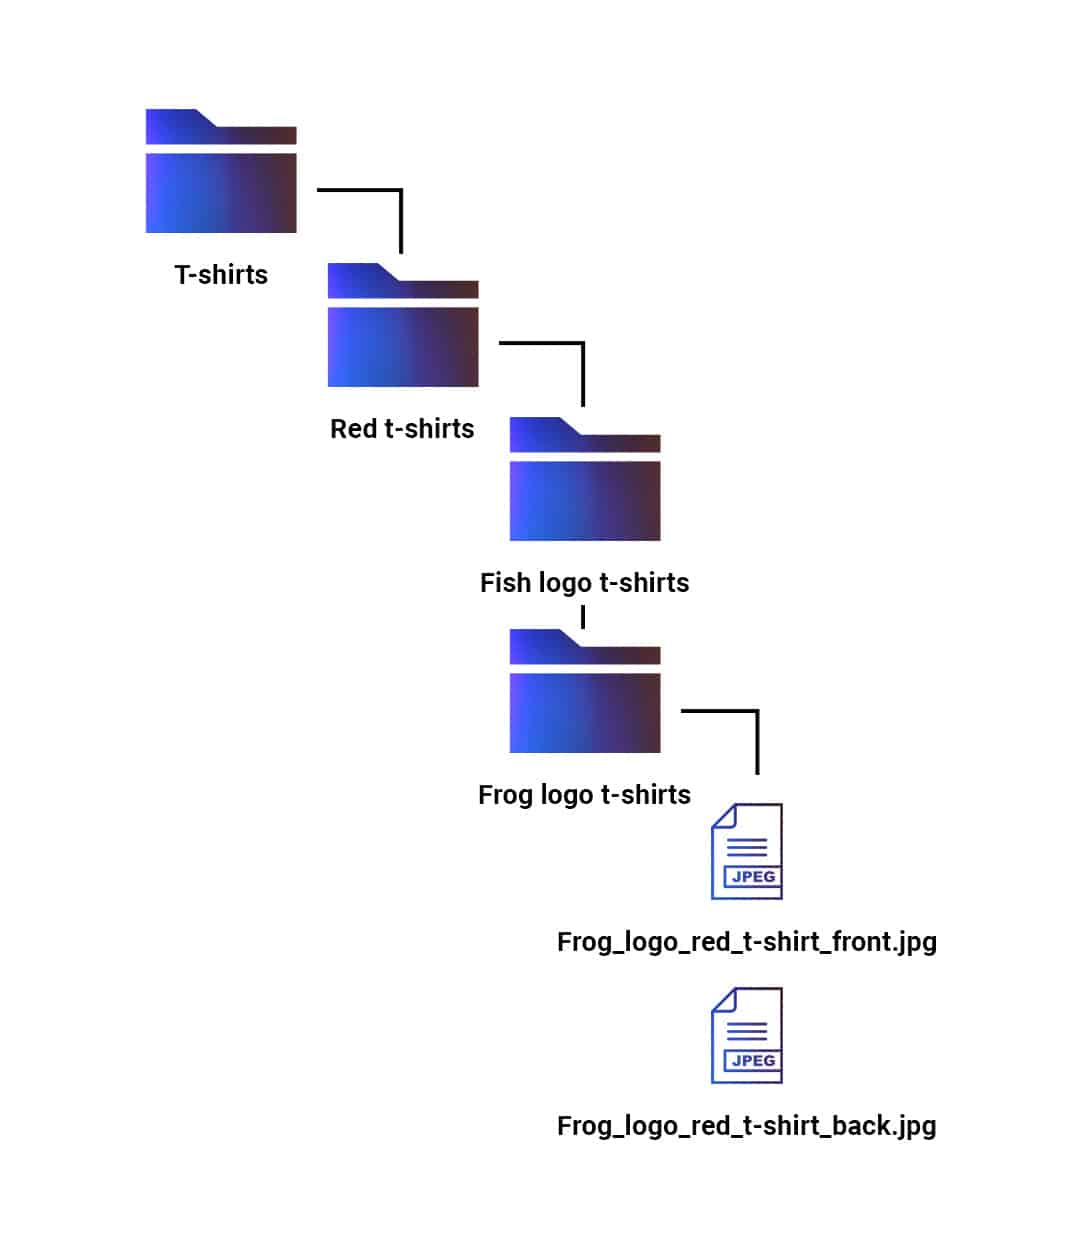
- Organizing Photos in a Folder Structure: Even small companies can end up with a large number of product photos, so before your collection becomes too disorganized, create an organized folder structure. Think about how your images should be cataloged, organized and stored. For example, each product family could have a top-level folder, each product in that family its own subfolder, and each variant of that product a sub subfolder. This last folder would be where you would save the photos.
- Creating Image-naming Conventions: Image-naming conventions can support good photo organization. Knowing what a photo is without opening it can save time and reduce errors. Red_shirt_1.jpg and Red_shirt_2.jpg are okay, but Red_shirt_front.jpg and Red_shirt_back.jpg are better. If you sell more than one red shirt, those names wouldn’t be very clear. Add detail to the name to make it understandable. Fish_logo_red_t-shirt_front.jpg and Frog_logo_red_t-shirt_front.jpg might be sufficient, but your product selection may require you to have longer or more descriptive names.
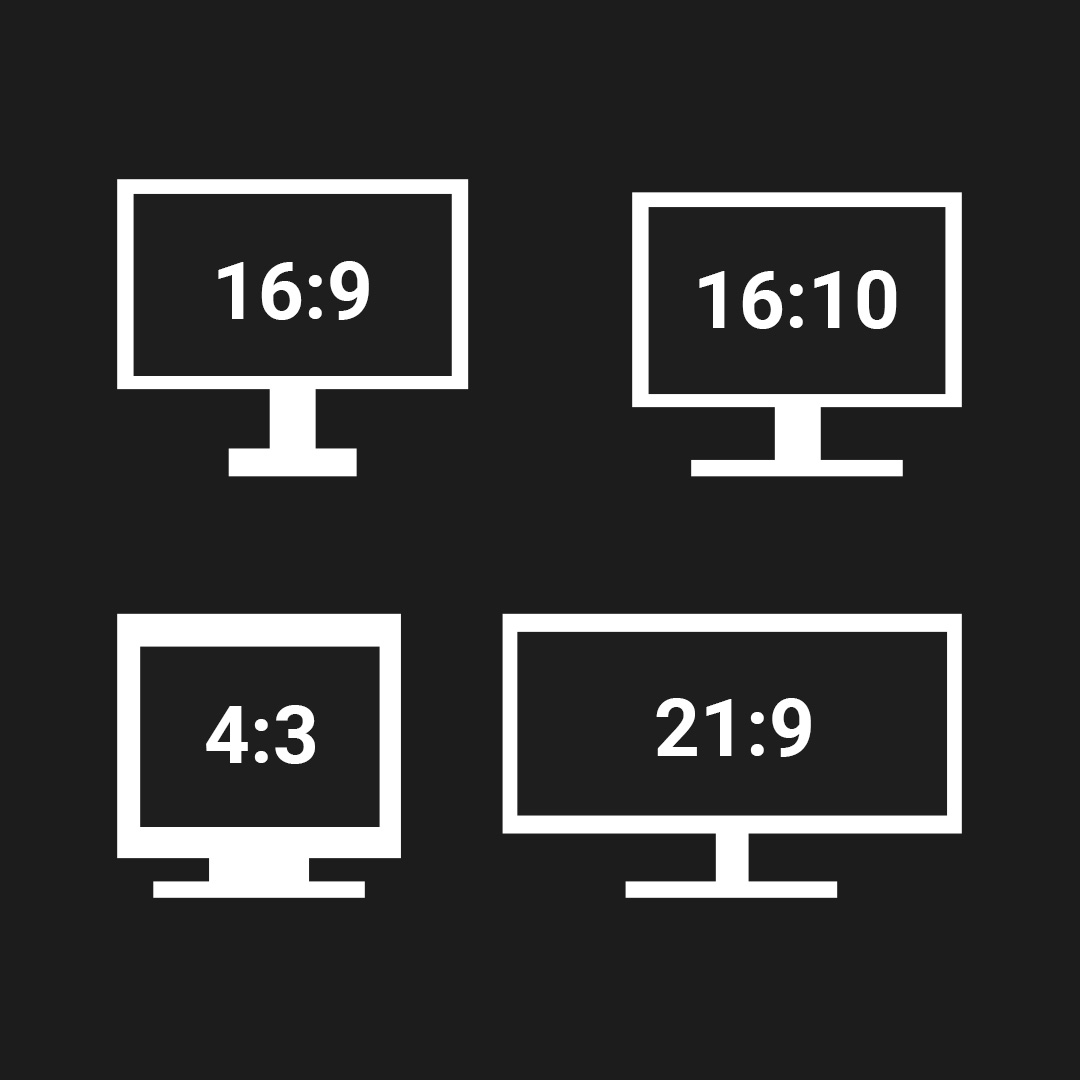
- Standardizing the Photos: Create standards for picture size, aspect ratio, and picture quality. Following these standards will keep your pictures and your site looking professional and consistent.
- Creating Metadata: Decide which metadata you will include with each photo file. Create metadata for shirt sizes, materials, catalog numbers, and anything else that will guide the backend systems that pull photos from your database, put them on the correct product pages and help your customers when searching for a product.
- Storage, Data Loss and Access: You might need to conder a few other questions: Will you store images on a cloud drive or a local drive? Will there be backups in case of data loss? Who will have access to the photo archive?
- Saving Samples: Decide if you want to save a sample of each product you’ve photographed in case you need to do a reshoot. If so, where and how will you store and catalog these items? Don’t forget to create a process to remove the samples once they are no longer for sale.
Revisit these organization methods periodically to ensure they are still properly supporting your business.
Image File Structure Example
Session Planning and Preparation
Before starting a photo session, decide what you want to accomplish in the session and which materials you will need to achieve your session goals.
The following methods will help you to prepare for your photo shoot:
- Plan Your Shots: Brainstorm a list of the pictures you plan to take for each product, including lighting setup and camera location, camera angles, and shot distance. Use this list to check off each shot you have planned. Plan shots of each product’s key features.
- Create an Equipment List: Make a list of all the equipment you’ll need: lights, cameras, lenses, chargers, cables, and all the products you want to shoot (plus any related accessories). Fully charge your batteries before the session begins. Determine if you will need an iron for clothes or any accent pieces for particular shots (lamps and tables for furniture shots or food for kitchen shots). Check off items from the equipment list as you gather them.
Photo Session
When you’ve finished your preparation, it is time to set up your studio area and take your pictures. Again, being organized before, during, and after will help everything go smoothly.
- Double-check that you brought everything on your equipment list to the studio.
- Set up the studio area, including the background, lights, and camera.
- Prepare the first product. Clean it, and place it on your work platform. If needed, secure it to prevent it from moving.
- Take a few test pictures. Then, adjust the equipment until you are satisfied with the results. Finally, record the settings of the cameras and lights if you need to perform a reshoot at a later date.
- Take the shots you’ve planned, and check them off your shot list as you go. If you note the file names that your camera creates, it will make it easier to find each photo during the editing process.
- If you need to reposition a product during the session (for example, photographing the back or the sides), re-secure it and retake test shots before moving on to your next photos.
- Repeat these steps for each product.
- Double-check your shot list to ensure you have not missed anything.
- Break down your work area, and put your equipment away.
Post-Production Processing
Depending on the editing application you are using, the steps you will take (and their names in the app) will vary. Changes you may have to make to your photos include:
- Resizing
- Sharpening
- Cropping
- Straightening
- Adjusting exposure
- Removing blemishes
You can create actions (similar to macros in Word or Excel) in many photo-editing programs to repeat editing and cropping steps and to create consistent-looking images. Some programs allow you to perform the same actions on multiple photos. Using this feature may help keep a consistent look to a batch of pictures.
Saving and Storing
Save your final images with the naming convention and in the file structure you chose when preparing your workflow.
In-House Versus Outsourcing Ecommerce Photography
Deciding whether to create your photographs in-house or to outsource their production will be affected by the factors that are important to you. Key elements are usually cost, speed, quality, experience, and convenience.
Aspects to consider when deciding whether to use an in-house or freelance photographer include the following:
- Cost: It will probably be cheaper to do it yourself.
- Speed: Taking pictures in-house will probably provide a faster turnaround.
- Quality: Outsourcing to a professional with a high-end camera will likely result in higher-quality pictures.
- Experience: Unless you have a professional photographer on staff, a freelance professional photographer will most likely have more experience and will be able to efficiently manage any problems that may appear.
- Convenience: If you do not care to manage the details, a freelance professional photographer is a good choice. But if you want flexibility in scheduling or making quick changes, staying an in-house photographer will be a better choice.
Tips for Doing Ecommerce Photography In-House
If you are taking your own ecommerce photos, remember that higher-quality photos drive sales and that displaying multiple images of each product leads to higher conversion rates.
You can improve in-house photography through the following:
- Use the best quality equipment you can afford.
- Showcase the important features of your products, including finer elements.
- Keep your file storage organized.
- Show all color variants of each product.
- Don’t photograph the product too closely. You can zoom in on the product in the editing process.
- Plan ahead.
- Use the photos to answer questions customers might have.
- Test shots are important to ensure all of your camera and lighting settings are getting you the best results and that you don’t have to reshoot.
Tips for Outsourcing Ecommerce Photography
If you are hiring a photographer, ensure that all your needs are known upfront, that they are responsive to your queries and that their costs are within your budget. You’ll also want to confirm their turnaround times and check their reviews and Better Business Bureau rating.
Beyond that, the tips listed above for doing in-house photography also apply.
Questions to Ask Ecommerce Photographers
If you have decided you are hiring a photographer, you should ask questions to determine if each candidate’s costs and services, methods, style, and expectations align with what you need.
Here is a list of questions you can download or print to begin the process of researching and selecting a professional product photographer. Add your own or change them to fit your business.
Cost and Services Questions:
- What are your fees? Do you charge by the day, by the shot or by the hour?
- What is included in the price? Do you provide props, styling and editing?
- What is not included in the price? Are assistants, expenses, models, overtime or image cataloging extra?
Technical Questions:
- What cameras and lenses do you use?
- What hardware and software tools do you use for post-production processing and editing?
- What is the format of the final images?
- Do you do 3D photography?
Style Questions:
- Where can I see your portfolio?
- Can you tell me about your style and influences?
Expectation questions:
- What is the turnaround time?
- How is your post-production process?
- Who owns the final images?
- What will you need from us?
- What does your insurance cover?
- Can you tell me about your training, experience, and credentials?
- Can I speak to some of your clients, both past and current?
- Do you save backups?
Challenges of Ecommerce Photography
Ecommerce photography can be expensive, time-consuming, and a bandwidth drain. However, because consumers are more likely to buy if there are multiple high-quality photographs, the money, time and other resources you invest will pay off in the long run.
However, ecommerce photography may not always be the best way to display some items. Technology like 3D commerce options, 3D modeling or 3D rendering may be more suitable possibilities. You can also look into 360-degree photography and 3D photography.
Keeping up with new trends in product photography can also be a challenge. Trends that may occur over the next couple of years include the following:
- You may see attempts at authenticity in product photos, including natural lighting, unedited images, realistic-looking models, and pictures of products in use in a realistic setting, including outside.
- Conversely, you may also see more artistic photos with geometric, modernist, or minimalist backgrounds, vivid neon lighting, monochromatic themes, and products that appear to be levitating.
- 3D and 360 product photos will continue to increase in number and popularity.
- Augmented reality (AR) and virtual reality (VR) images and video will also become more prevalent. Read about more AR/VR trends.
Stock Photography Versus Custom Ecommerce Photography
You may find and purchase product shots that meet your needs from an image library; this is called stock photography. Taking photos yourself or hiring a professional to do it for you is custom photography.
The benefit of stock photography is that it is generally cheaper and faster to purchase images than to create them. However, one disadvantage is images available online can be fairly generic, so you may not find a photograph with the camera angles and lighting that you are looking for that matches your other product images. Another is that there are now many sites with extensive archives, so searching for what you want may take a lot of time.
Investing in custom ecommerce photos means they will meet your guidelines and requirements. You will also have product photos from more angles. That means you can do more with the images and provide customers more images on product pages.
Meet Consumer Demand with Ecommerce Product Images
Consumers have very high expectations of ecommerce photography. In addition, consumers are expecting 3D photography, 360 photography, and AR when shopping online.
Converting and keeping customers online is all about providing them with all the information and visual representation of a product that you can. That’s where ecommerce product photography comes in. As noted above, products that don’t meet expectations set on a website’s product page get returned. Whereas products with multiple accurate images from varying viewpoints help closes sales.
3D Cloud by Marxent Can Help Streamline Your Ecommerce Photography Process
Some sellers might need better technology to achieve professional-looking ecommerce photography with less time and energy. 3D Cloud by Marxent’s AR-Enabled 3D Models offering can provide you with an inexpensive 360 presentation of your product to consumers.
The 3D Cloud by Marxent 3D Room Visualizer with 360 Product Viewer is the complete solution to configure, visualize, price and quote that delivers detailed, interactive 3D models for ecommerce product pages. Configure and show your products from every angle with speedy renderings of regular and semi-custom SKUs.
Ecommerce Photography Glossary for Beginners
3-Point Lighting: An illumination method that uses three lights. The primary source is called the key light; the other two lights will be positioned to eliminate shadows and shading.
360 Product Photo: A series of photos of an item joined so that a shopper can rotate it around a central axis.
3D Product Photo: Similar to a 360-product photo, but the image can be rotated around multiple axes rather than just one.
Adobe Lightroom: An image manipulation and storage application.
Adobe Photoshop: An advanced graphics editing program.
Augmented Reality: Where virtual items are imposed on the real world using a smartphone or other technology. Users can see what a couch might look like in their living room, for example. Games like Pokémon GO use augmented reality.
Aperture: The opening in a lens through which light passes. The photographer can change the aperture in manual mode or the camera in automatic mode. A larger aperture allows in more light.
Aspect ratio: The ratio between the width and size of an image, expressed by two numbers separated by a colon. Examples are 3:2 and 16:9. 1:1 is a square.
Bluetack: Putty used to secure items to a table or platform. For smaller items, Glue Dots are an option.
Bokeh: The out-of-focus areas of an image and the visual appeal of these areas. Using a narrow depth-of-field lens is a method to achieve bokeh.
Burst mode: Taking a series of pictures by pressing and holding the shutter button.
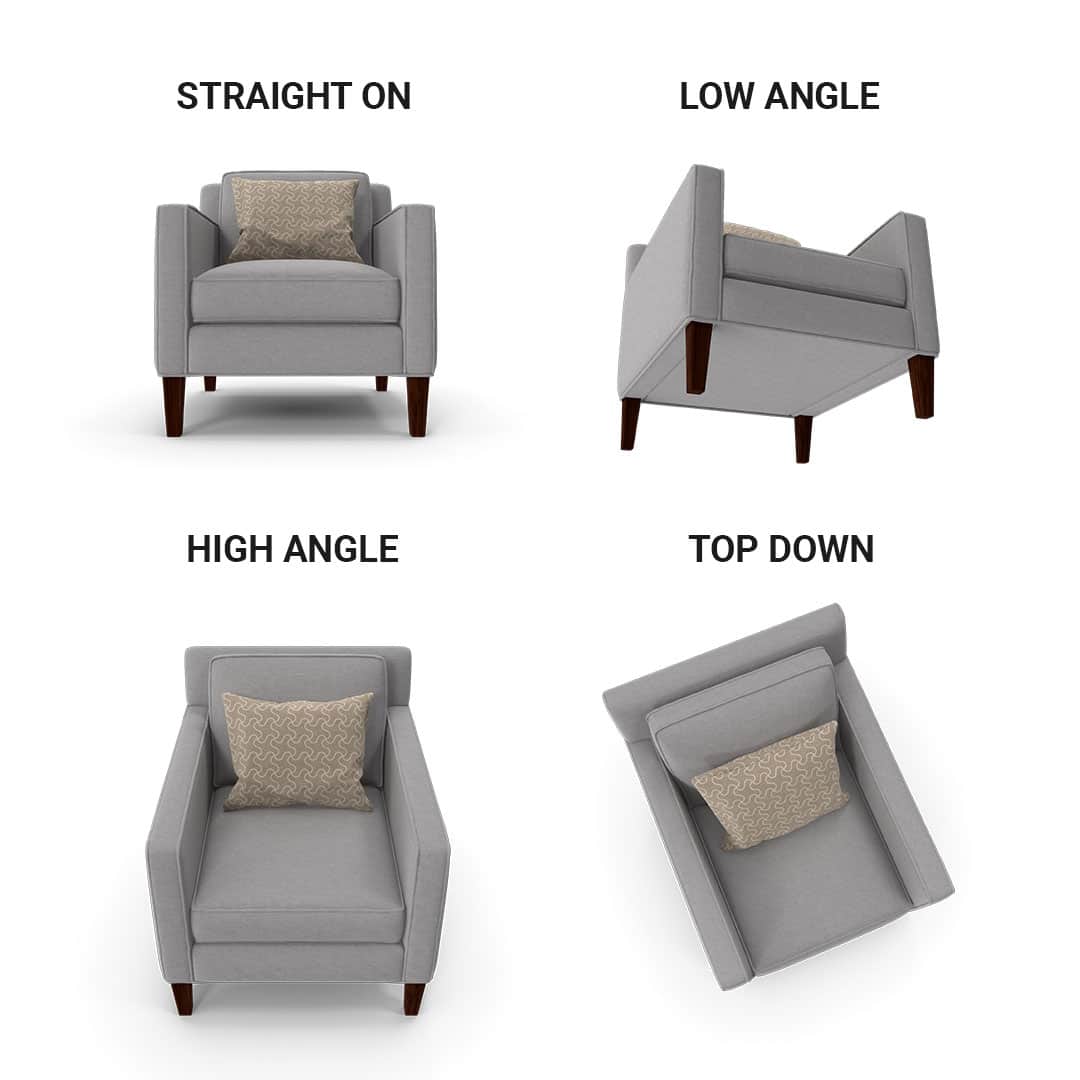
Camera angles: The slant of the camera as it points at the subject. General types are low (looking up), eye-level, high (looking down), worm’s eye (looking up from the ground), canted (the camera is tilted to the horizon), and bird’s eye (looking down from above). Eye-level and high are the most common in product photography.
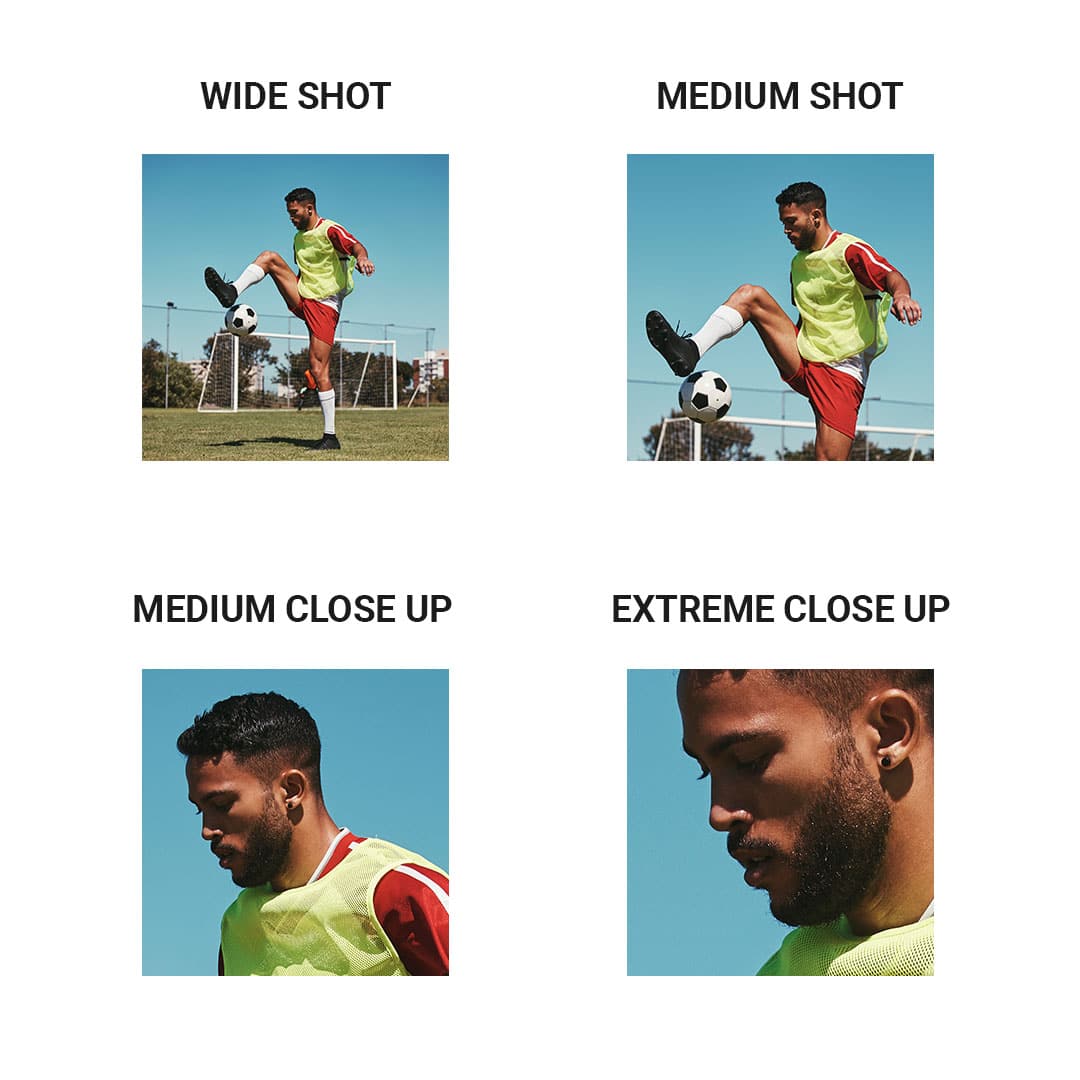
Camera shots: The general distance between the camera and the object in the photo. These include extreme-long, long, medium-long, medium, medium closeup, closeup, and extreme closeup shots. Medium and medium closeup pictures are most common in product photography; long shots are generally not useful. Closeup shots can highlight important features of a product.
Compression artifact: A distortion or glitch in an image created during image compression.
Custom photos: Photos taken for a specific purpose, as opposed to stock photos.
Depth-of-field: The distance between the farthest and nearest objects in focus in a photo. When taking a product photo, your depth of field needs to be large enough that all parts of the item are in focus.
Diffuse lighting: Light originating from a large surface, whether the light comes from a lamp or a reflector. Diffuse lighting can make your product photos better.
Exposure: The lightness or darkness of a photo.
Glue Dots: Little sticky things that can keep small items from moving. They are a smaller version of Bluetack.
Hot shoe: A spot on top of the camera designed to accept accessories, generally used for a flash.
ISO: The light sensitivity rating of a digital camera. A higher number indicates greater sensitivity.
Long exposure: Leaving the shutter open for a while. Used in low-light situations or to add the illusion of motion to a shot. Long exposures are not used often in product photography.
Model release: A form that a model signs to grant the photographer the right to use the photos taken.
Natural light: Light that comes from the sun. It is not in the photographer’s control, so artificial light is more consistent.
Noise: Visual distortion in a digital photo. It can be anything from a small grain to the discoloration of a large area.
RAW: An image file format, like JPEG or PNG. Unlike those, RAW is uncompressed.
Reflector: A device that allows light to be reflected onto a subject to eliminate shadows and shade.
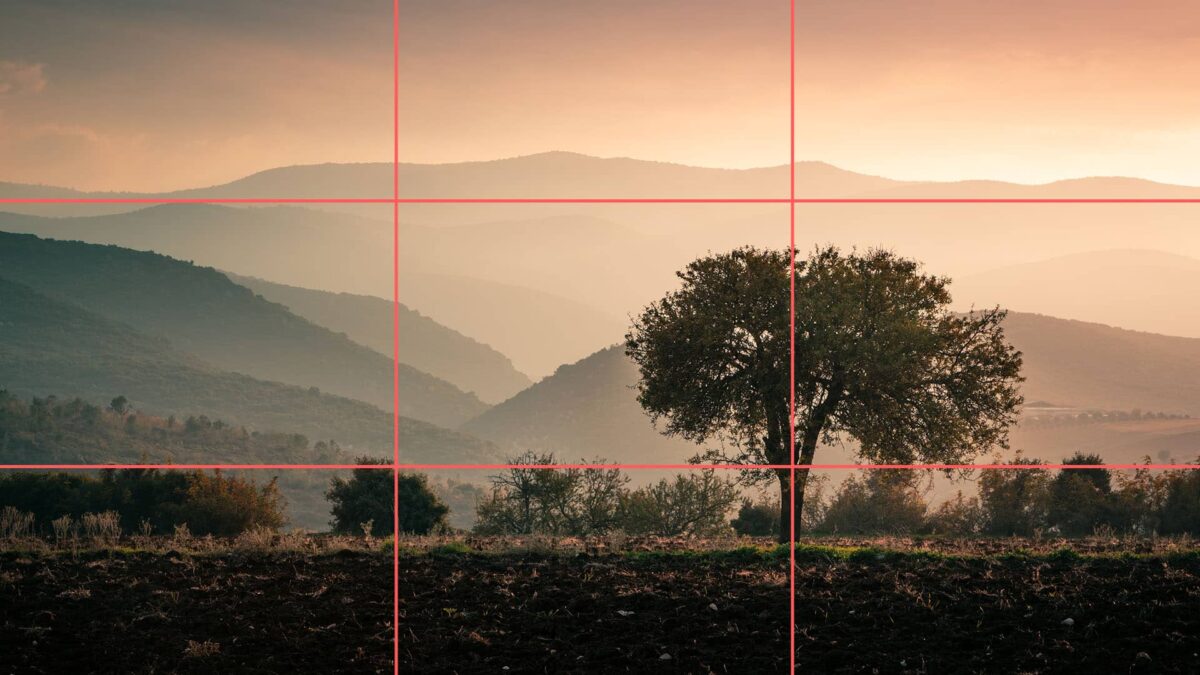
Rule of thirds: A rule of thumb for composing shots. Divide the frame into nine equal parts (like a tic-tac-toe board). Putting the subject in the left or right or top or bottom third of the image makes a more interesting composition than having it in the center of the picture. However, because of the needs of product photography, it may not be applicable in many situations.
Shutter speed: How long the shutter stays open.
SLR: Single Lens Reflex, a kind of camera that uses a mirror and prism. The subject is viewed and photographed through the same lens. As a result, the photographer has a more accurate view of what they are about to shoot. When the shutter is triggered, the mirror moves out of the way.
Stock photos: Easily-available shots that can be purchased, as opposed to custom photos.
Viewfinder: What you look through to frame your picture.
Virtual Reality: A simulation of 3D space using a computer and headset. The space can mimic a real place or be completely made up.
White sweep: A background used for product photography, which provides both a horizontal and vertical surface.
Workflow: The process of organizing and preparing products, shooting and editing photos and then cataloging the final images.
Zoom: Optical zoom happens by adjusting a lens; digital zoom happens in software. SLRs generally use optical zoom; smartphones use digital.


