
3D photography brings images to life and creates immersive viewing experiences. This article covers 3D photography basics. Discover how 3D photography works, explore methods for taking a 3D picture and learn how to use 3D visuals to promote your e-commerce business.
In this Article:
- How 3D photography works
- How to take a 3D photograph
- 3D product photography tips
- Selecting a 3D photography platform
What Is 3D Photography?
3D photography attempts to create images that duplicate human vision as closely as possible. This practice produces images with depth that makes you feel like you are at the scene of the photo.
Ordinary photographs create a flat representation of a subject. We can perceive height and width from the standard photos, but not depth. 3D photography techniques merge multiple pictures of the same scene to bring depth perception to an image. These photographs jump out and shift angles as viewers change their viewing angles.
Photographers will include 3D photographs in their online portfolios to show they have more skills. These pictures can provide a fun way to share memories with friends and family on social media. The medium also has tremendous potential for ecommerce product visualization.
Key Takeaways:
- 3D photographs combine two images of the same subject taken from different distances to produce vivid, three-dimensional images.
- You do not need fancy, expensive equipment to take a 3D photograph.
- The use of 3D photography has only recently become widespread, but it has been in use for more than a century.
- 3D photography platforms create stunning 3D visuals from a single product model, eliminating costly photoshoots.
Why Is 3D Photography Important?
3D photography allows viewers to interact with a product image by rotating and viewing it from any angle. This experience offers more detail, which reduces buyer uncertainty. 3D photos can bring the benefits of in-person shopping experiences to the web.
The 2014 paper “Is a Picture Really Worth a Thousand Words – On the Role of Image in E-commerce” details how product images play an essential role in influencing a customer’s decision. The authors of the study, first presented at the 7th ACM (Association for Computing Machinery) Conference analyzed online consumer behavior data to understand the role product photography plays in influencing customer decisions. To drive a successful ecommerce venture, you must invest in top-notch visuals.
Modern ecommerce customers demand more from visuals: they want to see products from every angle, inspect fine details, picture it in use, and even try it out. In this sense, traditional photography does not live up to today’s standards, whereas 3D photos provide a more realistic image that can be viewed from many angles.
The paper “Multimodal User Interaction Framework for E-commerce” discusses the limits of 2D photography. In the study, first presented at the 2019 International Research Conference on Smart Computing and Systems Engineering, researchers described prototypes for new 3D visual ecommerce applications. The authors rationalize their study with several observations on the limitations of the current web interface for customers. They argue that vendors must seek multiple product visualization modes to engage and attract consumers.
3D photography accomplishes what traditional photography cannot: interactive customer engagement with a product. Imagine an entire 3D product catalog dropped on your social media page, with consumers able to drag and rotate your product to any angle. Picture a 3D showroom with your best architecture, design, and real-estate sets – all created from a single 3D rendering.
What Is 3D Product Photography?
3D product photography refers to the process of creating computer-generated product images. Though 3D product photos look like normal pictures, they’re created on a computer. You can use a digital camera to take all the photos of the product, but you’ll need software to stitch them together.
Although 3D product photography technically refers to computer-generated, static images, there are many types of visuals that use 3D photos. For example, 3D product views can be made in hemispherical formats, allowing the user to rotate the product and see it from all angles.
The mix of 3D visuals ideal for your product depends on your customers’ needs. For example, an item largely valued for its aesthetics, like jewelry, may not need a full 360 product view. However, customers looking for furniture or other large items may benefit from visuals that provide a sense of the product’s size and scale. You’ll want to factor in these considerations when crafting your 3D ecommerce strategy.
3D images can also cost a fraction of a traditional photo shoot. Typical 3D photography pricing tends to be significantly lower because 3D visualizations can be created from a single 3D product model. Using only a single model eliminates the costs of transporting multiple items and studio rentals needed. 3D photography’s innovative features and budget-friendly setup gives it immense potential to take over product visualization.
Furthermore, 3D visualization comes with advantages unique to our time. As the COVID-19 pandemic has wrought havoc on public health and the economy, consumers hesitate to shop in person. With a well-taken 3D photograph, customers can safely and effectively experience a product online from their homes.
How Does 3D Photography Work?
3D photography adds depth to images. The method gives a third dimension to 2D photographs that only convey height and width. To create a 3D picture, a photographer merges two photos of the same subject taken from different angles.
Studying how binocular vision works can help us understand 3D photography. Our left and right eyes perceive slightly different images due to the positions of the pupils relative to the subject. The brain processes both images simultaneously, allowing us to perceive distance and depth.
3D photography works in much the same way; the photographer takes separate photos of the same subject from two different distances. Ideally, the distance between the images equals the separation between pupils, approximately 2.5 inches. Taking a 3D photo of a live-action subject is much more complicated, requiring special types of prism attachments.
You can use any camera – or even a smartphone – to take a 3D photograph, so long as you pay attention to your technique.
There are three main types of 3D pictures that differ based on how you view them.
Traditionally, 3D photographs were sold in sets of two and placed in special viewers. These devices have two lenses—one for each of your eyes. When you look in the viewer, your brain merges the photos into one 3D image with depth.
Anaglyph 3D photographs are printed in two colors: one red and one blue. Now, we merge photos digitally to see them on a screen. However, in the days before the mass use of computers, we printed the pictures on the same paper. When viewed with red-cyan glasses, like those used to watch 3D movies, the brain is tricked into seeing a 3D image.
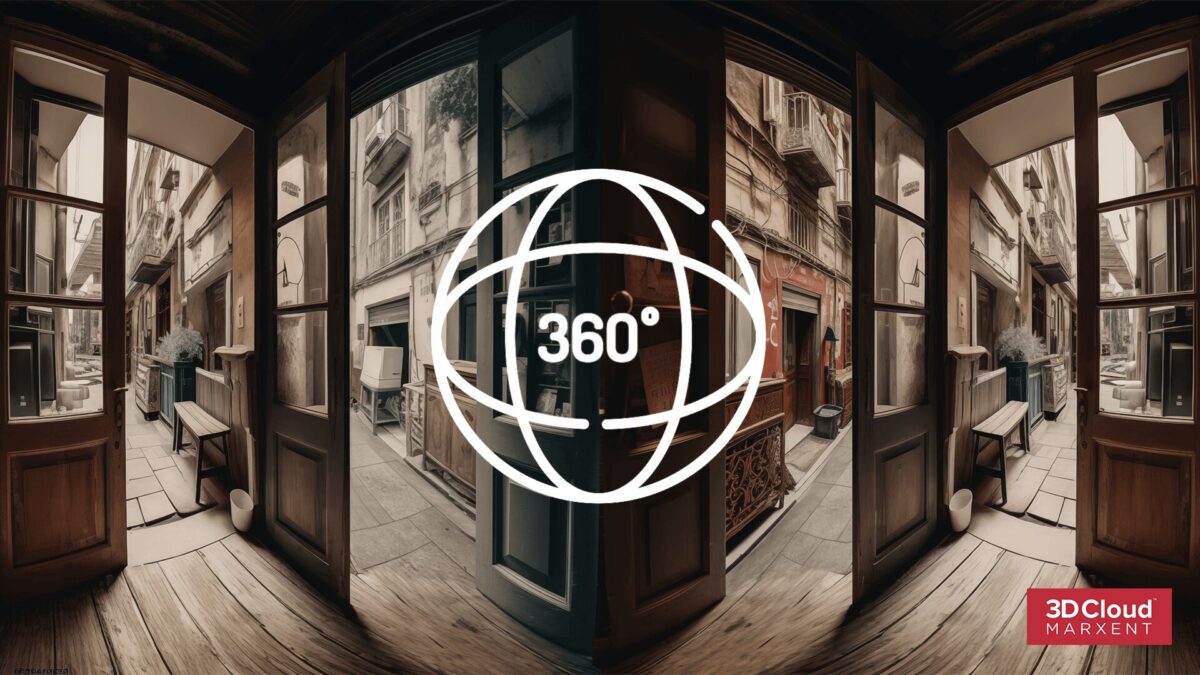
Modern 3D photographs typically are seen as a merged GIF that moves when the viewer shifts perspective. Known as “wiggle 3D,” these images do not require any additional equipment like a viewer or glasses. To see a 3D image on a smartphone, move the phone. To view the image on a laptop, you must click on the image and drag both sides for a complete view.
3D Photography Examples
3D photography can be found anywhere on the internet but some of our favorite samples are found in this article written by Mito Habe-Evans for NPR’s “The Picture Show.” Get inspired for your next project.
How to Take a 3D Photograph
Photographers use one of two methods to take a 3D photo: merge two images or use post-production software to add 3D elements to a single shot. Relying only on software yields mixed results.
The most popular method to take 3D photos is to mount a camera on a tripod and take multiple shots of the same subject from each angle. Follow these steps to take and process your first 3D photograph:
- Pick a subject.
Find a scene with a prominent foreground and background for optimal depth perception. - Take the first picture head-on.
Use a digital camera to take a straight shot of the scene, with the subject in the center. - Move the camera left to right in tiny intervals to take multiple shots.
Keeping the subject in the same place in the viewfinder, move the camera an eye-width distance (about 2.5 inches) to the left and take another photograph. Repeat the process to the right. - Use software to turn the images into a 3D photo.
Upload the photographs onto your computer and use your preferred software to merge them. The software and post-production methods vary based on whether you hope to create an animated 3D image, or a 3D photo that requires 3D glasses to appreciate.
You can also use a dual-lens smartphone and some software to merge the images to take a 3D photograph. These phones have two cameras positioned on the back of the device. When the user selects the 3D photo option, both lenses take multiple shots of the same subject from different angles. The phone then uses software to combine the photographs to create a depth map and a 3D image. Mobile apps like LucidPix and Parallax convert your 2D photos to 3D quickly.
Tips for Shooting 3D Photos
3D photography offers a unique and exciting way to showcase a product. Follow these essential tips to make sure you get the 3D product photo you want.
- Use the Same Settings: Only the perspective should vary between the photographs you are merging—any other feature used to customize a photograph’s exposure must be identical. So, the aperture, the size of the hole through which light travels to the camera, and the shutter speed, the speed at which the camera’s shutter closes, must be the same in both photographs. Ensure that other settings like manual focus and white balance are consistent.
- Focus on Contrast: Your 3D photo will pop more when your subject has contrasting colors. For example, a black product staged against a dark background will not create the same visual depth experience as it would against a lighter background.
- Maintain Depth: Do not shoot against a flat surface, like a wall. Doing so removes depth from the photograph, defeating the purpose of 3D photography. Positioning your subject against a clear foreground and background helps avoid flat images.
- Take Many Pictures: Digital photography has no additional cost for each still you take. Taking many exposures reduces the chance of re-doing the shoot because something was off. Having many images also allows you to pick the pair of photos that create the most satisfying 3D effect.
- Find the Proper Distance Between Photos: When shooting a 3D photograph, you must consider the optimal distance between the images: the further away your subject is, the greater the separation between photos must be to create depth. To be safe, shoot many photos, and start with the distance between pupils, around 2.5 to 4 inches.
3D Photos and Social Media
Social media presence and visual ecommerce go hand in hand. To build a robust social media business, you need fresh, compelling, high-quality content. 3D product photographs will pause scrolls and give your products more attention.
Facebook, Snapchat, and Instagram make it easy for users to post 3D photographs. Currently, these platforms take a 2D image and convert it to an animated photo that moves as the user changes their perspective. So, you can share 3D images with anyone—no special equipment is required.
In the past, only photos taken from smartphones could be converted into 3D images on major social media websites like Facebook. However, according to Nemanja Sekulic, a prolific digital artist and instructor, “we can now create the 3D effect from any photo we want with the help of Photoshop.” This means that, with a bit of help from software, you can generate 3D depth maps to go along with any photo, including those not taken with a smartphone.
3D visuals are still futuristic ideas that people don’t use heavily on social media. By focusing attention on 3D product photos now, your social media posts will stand out, earning more followers and engagement.
3D Photography Equipment
Any standard digital camera can take a picture of a stationary object that you can turn into a 3D photo. Additional equipment like tripods is vital to assure consistency between shots. Shooting 3D photographs of moving objects requires special equipment like stereo lenses.
The quality of your 3D photography will benefit if you invest in a camera that can handle low-light situations well. Start with purchasing a full-frame sensor camera or one with an extensive ISO range. You could also buy a new smartphone with dual lenses and the right apps, arguably the easiest way to get started with 3D photography. Finally, any budding 3D photographer must have a tripod to ensure that the camera does not move between frames.
If you are hoping to shoot moving subjects, a single camera will not suffice. You can either use two cameras with a dual-camera mount on a tripod or purchase a stereo lens that splits the camera’s view into two different angles.
History of 3D Photograph
Although 3D photography seems like a modern invention, the concept has been around for centuries. Current techniques rely on the same principles, but technological advances make it easier to take and view 3D photos.
3D Photography Timeline
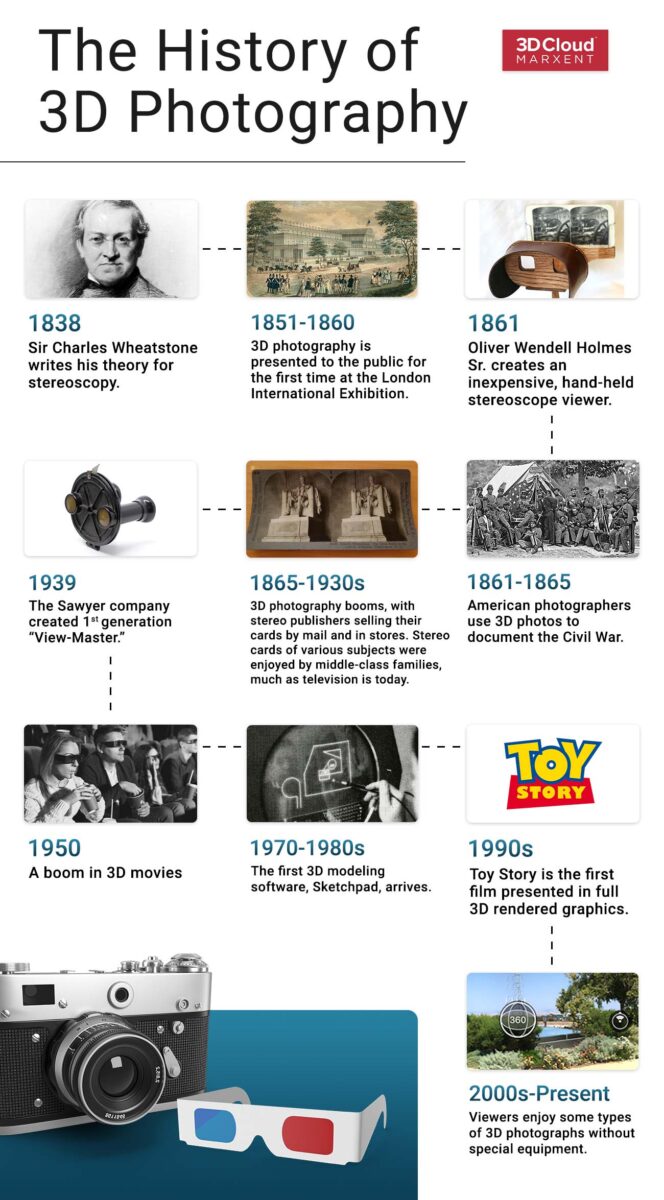
1838: Sir Charles Wheatstone of England details his theory for stereoscopy—how the brain creates a 3D view from the composite images of the left and right eye. Wheatstone and others worked to apply his finding to add depth to photographs. They created a bulky, expensive viewer with two lenses so one could look through both and see a merged, 3D image.
1851 – 1860: 3D photography is exhibited for the first time to the general public at the London International Exhibition. Queen Victoria became interested in the media, popularizing it in in elite, affluent circles. The current bulky and expensive stereoscope viewers were still not practical for the public to use. Around this time, American photographers began taking 3D photographs.
1859: Oliver Wendell Holmes Sr. develops an inexpensive, hand-held stereoscope viewer, allowing the public to enjoy 3D photographs.
1861 – 1865: American photographers document the Civil War with 3D photography. Photographers take two images of the same scene, only shifting their perspective. These two images would be printed side by side to be viewed in stereoscopes.
1865 – 1930s: 3D photography enjoys immense popularity, with companies forming for the sole purpose of creating 3D pictures. Landscape shots of the Alps, stills of museum exhibits, and photos of major events are created with 3D photography. At home, people can view the reels, not unlike viewing the news today.
1939: The Sawyer company creates the “View-Master,” the most popular, lightweight stereoscope invented to date. They sold various 3D slides, including a reel of Walt Disney characters for kids.
1950: The 1950s witnesses a boom in 3D movies, like Alfred Hitchcock’s Dial M for Murder.
1970 – 1980s: The first 3D modeling software, Sketchpad, arrives in the 1970s. Only architects and artists and use the software. During the 1980s, the software improves and becomes more readily available.
1990s: 3D rendering technology takes off, with Toy Story being the first film ever presented in full 3D rendered graphics.
A few years before the advent of photography, Charles Wheatstone described his theory of stereoscopy, or how the distance between our eyes allows us to perceive depth. Wheatstone, along with other photographers, quickly recognized that if two cameras were placed 2.5 inches apart (the average distance between pupils), you could photograph two images and merge them to create a 3D photograph.
Though taking a 3D photograph was relatively easy, viewing them was more challenging. Wheatstone’s 3D photo viewer, a large device overloaded with prisms and mirrors, was bulky and expensive, making 3D photography a medium exclusive to those who could afford it.It took another decade for photographers to create a 3D viewer that was not cumbersome in size or too expensive to purchase. These lightweight viewers had a tray built to hold two photographs. If you looked into the separate lenses, your brain would merge the two photos into one 3D photograph.
Once inventors developed a lightweight, inexpensive viewer, 3D photography took hold quickly. Stereo card series—a series of 3D photographs—were everyday entertainment items prevalent in many family homes. Photographers documented significant events like the Civil War with 3D photographs, taking two images of each scene by shifting their position or using a camera with two lenses. Some of the most iconic Civil War images started as either the left or right version of a 3D photograph.
Despite its long history, 3D photography has never taken hold because of the equipment needed to view photos. From binocular cameras to modern red and cyan 3D glasses, there has always been a barrier to experiencing 3D visuals. Furthermore, before the internet, photos were published exclusively in print, a medium not well-suited for 3D photography.
With the advent of cameras, smartphones, and apps that create 3D pictures you can appreciate with the naked eye, 3D photography is poised to explode in use and popularity.
3D Photography Platforms
3D photography platforms can create stunning 3D visuals of any product. Leverage modern software to create scalable 3D content for your entire catalog, all without the expense of traditional photoshoots.
Although 3D photography offers tremendous benefits, most businesses still partially rely on traditional photoshoots and do not have in-house 3D rendering experts. Outsourcing 3D model services to professionals will save you time and money on costly photo shoots that would have to be repeated for every product, in every desirable angle.
For architects, retailers, or designers who sell products or entire spaces creating a 3D room planner can effectively showcase your sets. Otherwise, designers would need to invest in setting up and tearing down each room, with costs adding up quickly. 3D photography platforms also provide 360 photography services, allowing potential customers to see your product from all possible angles, closing the gap between the online and in-store shopping experience.
3D photography platforms like 3D Cloud use a 3D model of your product and render it to create realistic 3D or 2D visual content. These services are remarkably scalable for companies with many products. With one scan of each product, you can create a complete 3D or regular product catalog.
These 3D photography platforms do not just provide visuals: they also come with business analytics, workflow management, and order tracking. You can use the software to manage client branding, edit existing, content, and create innovative content, such as inspiration rooms a customer can browse as if they were at a traditional store.
Streamline 3D Photography Commerce Efforts with the 3D Cloud Product Visualization Platform
As 3D technology inevitably improves, businesses are turning towards 3D rendering services to optimize their visual ecommerce needs. Partner with 3D Cloud to create and manage your library of 3D content and get the most out of your visual ecommerce strategy.
3D Cloud promises and delivers on scalability and reusability. Build 3D content once and distribute it across all channels and to all collaborators, including your internal team. Work with 3D Cloud’s experts and easy-to-use software to create product assembles, inspirational catalogs, and product campaigns.
Add your product campaigns to the over two million 3D projects managed by 3D Cloud. Trusted by major enterprise brands like La-Z-Boy, Macy’s, and Bloomingdales, 3D Cloud’s comprehensive, collaborative approach to creating and integrating 3D content has robust, proven success.
Give your customers a new immersive 3D experience with 3D Cloud and watch your sales grow.


